14.1.12

What I'm working on...Strawberry Shortcake Invitations!

I just noticed it's been a month since I last posted.  I guess I got a bit distracted by the holidays, but I am back in full force, and gearing up for my little Shortcake's 3rd birthday!  Naturally she chose Strawberry Shortcake as her theme, and since I get to plan it, I have decided to go with Vintage SS of course!  I usually love the task of designing invitations. I consider them to be kind of a specialty of mine, unless of course I have no ideas.  That's how I was feeling about this theme...no inspiration, and really not a lot of time to put it together either.  I decided to just go to the craft store and explore the scrapbook section to see if anything popped out at me.  I ended up finding some super cute "SS" inspired papers, and somehow an idea emerged.  What about a tiny doll sized file folder full of scraps...random I know, but since I had nothing else, I went with it!  I think they turned out pretty cute on such a whim.  My favorite part is the tiny envelope on the inside with a shrinky dink and cord included to make a little necklace...so 80's, right?  I think this file folder idea could be used for so many themes, so I'm including some of the templates I made to create the pieces.  If you happen to use any of them...send me a pic, I would love to see your ideas!


The pink envelopes came from a pack of notecards I found in the dollar section, so 6 for $1 plus now I have extra notecards...score!  To make them a bit more custom, I lined them in a cute strawberry print.  To do this, all you have to do is open up the flap of your envelope and trace your envelope (flap open) on a piece of paper.  You will want to deduct about 1/16" from each side and bottom for an easy fit, and about 1/4"-1/2" from the top of the flap where the glue line is.  Cut out your template and trace it onto your cute paper, and cut it out.  Insert this piece into the envelope and fold down the flap piece to create the fold line.  To secure, I usually just glue down the flap part to the envelope flap with a glue stick...no need to glue all the way down. Now you have a super cute custom envelope to match any invitation!

Here are the templates I created for my file folder card and tiny envelope.  Just print, cut out, and then trace around it on your decorative paper.  I used a cardstock for the folders, and paper for the envelope.
File Folder Template
Small Envelope Template

16.12.11

Paparazzi Look for Less!

Wow, check out these silver Petals Chandelier earrings from Blue Nile...$105, and at this moment they are backordered on their website.

You can get a VERY similar pair of Paparazzi chandelier earrings for only $5!!!  Available through me of course, and for $105 you can buy 21 items!  Men if you are looking for something unique for your girl this holiday, give her a shopping spree with Paparazzi...message me for details.

8.12.11

All About the Flowers

Fabric flowers are so easy to make, and can add flair to any top, jacket, hat, bag...you name it!  Trust me, once you start with these things, you will be addicted just like me!  I am going to outline how to make 3 different styles of fabric flowers.  You can see how I used these flowers in the tutorial for my Embellished Flower Tee!

You will need:
• Scraps of fabric and felt
• needle and thread, fabric tack, or hot glue
• scissors
• embellishments (optional)
• Pattern (for Sweetheart only).
Sweetheart Flower Pattern


The first style I like to call the "Sweetheart", and you will see why.


1. Start out with about 8-10 squares of your fabric.  If you are using my template you will need 3.5" squares for the large size, and 2" squares for the baby ones. Take each square and fold it in half, and then fold it in half again, so that it forms a smaller square.

2. Place the point of your heart pattern at the corner where the folds are, and pin in place.

3. Cut out pattern through all thicknesses.  Now you should have a clover shaped petal when opened.

4.  Create your corresponding circle shape out of felt.  Take each petal and fold back into heart shape, and with a needle and thread, or a dab of fabric tack or hot glue, attached the point of the heart to the center of the felt base.  When folding your hearts it is not necessary to match up the shapes exactly, in fact if you do match them up, your flower may not have as much body.  Try folding the shapes on the diagonal.


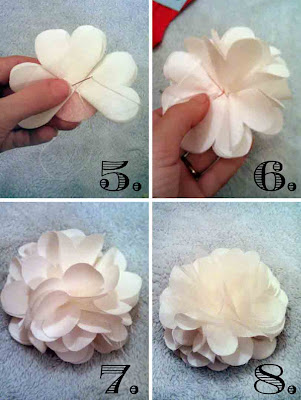
5. Continue attaching three more petals in the center (4 total), matching up the sides.

6. Add another layer of 4 more petals,making sure to stagger the placement so you are not stacking them exactly on top of one another.

7.  Fluff your petals a bit, and now you will start to see your flower take shape!  If adding an embellishment to the center, such as a button or rhinestone, you can do that now.

8. If you like the look of a plain flower, add two more petals to the center. Or in this example I added several layers of tulle.

And that's all there is too it!

••••••••••••••••••••••••••••••••••••••••••••••••••••••••••••••••••••••••••••••

Next we have the "Bird's Nest" flower.  This flower has a very romantic, shabby appearance, especially if you leave the edges raw.


1. Start out by taking at least 15"-20" length of fabric and cut 1"-1.5" strips from it.  To create the raw edges, simply snip a starting line with your scissors, and rip the rest of the strip off.  This will not work with knits, but will create a nice straight line with your woven fabrics.

2. Next tie a knot at the end of the strip...this will become the center of your flower.

3.  Fold your strip in half with the right sides facing out, and start to wrap the strip around the knot, turning every inch or so.  This may take a little practice, but you will start to get it down, and it will not need to be perfect.  Add a drop of glue, or make a stitch after every couple of turns.

4.  When the flower is at the size you want it to be, cut off the excess fabric, and simply glue or stitch the last bit down in the back.  Finish up with attaching a felt circle to the backside to hide your glue or stitches.

••••••••••••••••••••••••••••••••••••••••••••••••••••••••••••••••••••••••••••••

And last but not least we have a simple Rosette.


1. Determine what size you would like your finished flower to be, add .5" to that total, and that is how wide you will need to cut your strip of fabric.  Mine was about 3.5" wide, and about 24" long.  Fold the strip in half lengthwise, so that the long raw edges meet.

2.  Take a needle and thread, and make long even stitches all the way down the length of the folded strip.  You could also you use the basting stitch on your sewing machine.

3.  Pull the tail of your string to gather the fabric.  Tuck under one end (I like to fold twice, and angle it down...see pic), and secure it with glue or stitch down.

4. Next create your Rosette by wrapping the gathered strips around the center point, with the raw edges to the center.  Secure with thread or glue, and add felt backing.


Of course with any of these flowers you can jazz them up with embellishments.  A cluster of tiny pearls, a big rhinestone, a button...I've even glued tiny bird eggs I found in the floral section of the craft store.  This is the part where you get to be creative!

If all this looks cool, but a little too complicated for you, my $5 Paparazzi flower clips are AWESOME!  They have both an alligator clip and a brooch pin on the back, and some even come with a pony tail holder.  Comment on this post, or email me, and I can tell you how to buy!

Knock off for less! Embellished Flower Tee

Hey there fashionistas!  Today I will be showing you how to re-create this adorable top from Tea Collection!

I love the gathered neck detail on this top, but for the sake of ease and price tag, I just picked up a solid long sleeve tee from my local thrift store.  Actually I found 4 super soft tees, same size from the Children's Place for 99 cents each...pretty hard to beat!


Instead of copying the "TEA" shirt exactly, I thought it would be really fun to integrate different types of fabric flowers.  I started out with some scraps of fabric I had in my craft closet.  Of course this is an advantage I have from years of sewing, but I have seen fabric scraps lots for sale on ebay or garage sales, etc. and they really do come in handy!  You can also check out the fat quarter section of your fabric store or most places usually have a remnant section as well which is usually discounted.
I wanted the colors to really pop, so I ended up with 4 solid colors in varying weights and textures, and one print.  The lime green faux boise wood pattern is especially sentimental to me because this scrap was left over from the crib bedding I made for my baby girl!  See now I am recycling special memories too...love it!

Check out my next post All About the Flowers to see how I created the fabric flowers out of my scrap fabric pieces.  I created 5 flowers for this project and made sure to vary the sizes for visual interest.  I also chose to use the sewing method for these flowers, so that they would not fall apart in the washer.  Once they were completed I played around with the placement a bit, and then pinned them down around the neckline of the tee. 

To secure them to the tee, once again I used a needle and thread, and carefully stitched each flower down.  Taking care only to stitch the felt circle the flower is attached to.  It is also important to tie off after each flower is stitched in place, as opposed to sewing them all down with one length of thread.  This will prevent the shirt from stretching, and the threads may break when you try to put it over your cutie's head.
(inside of garment to show stitching)

I embellished two of the flowers...one with a coordinating button, and one with a large craft rhinestone, which I just hot glued on.  She wore this top today, and I got a ton of compliments on it.  I bet no one would believe it only cost me 99 cents and about 45 min of work!


26.11.11

What she wore!

Remember the fun fabrics I picked up several weeks ago from Hancock Fabrics?  Well, here is the first outfit that came from those finds!  I made this for her to wear to our Thanksgiving dinner.  It's hard to tell from these grainy pics, but the pants are knit, and they are SOOO soft!  I embellished them with a cute little label, but they are hand made.  I'm calling these the Shortcake Pant and I will be posting a pattern for them as soon as I get it graded for ya!  It will be a two in one, with an option for a wide leg, no ruffle as well.  With a super comfy yoga waistband, these are my new fav pants!


23.11.11

BLACK FRIDAY EVENT!


FREE Ear Warmer Headband Pattern!

I have been wanting to make one of these for so long, and with the cold weather nearing I was finally inspired to try out this free pattern.  This pattern is a little more difficult than making a scarf because of the increases and decreases, but it's still fairly easy.  The author has a link to a page of tips too.

Here is a pic of my finished project.  Oh, and by the way, I got my yarn at the Dollar Tree, and it's nice looking...not too cheap I promise.
And for those of you who love the look, but are not the knitting type, here is a link to my friend Jody's store, Bagabow where she has really cute ones for sale!

HAPPY THANKSGIVING FASHIONISTAS!!!